Bookcase with Hidden Compartments
- Jun 2, 2021
- 4 min read
As someone who reads a lot, you end up collecting a lot of books, which then require a bookcase to hold them all. I really liked the one my brother had, but being me, I of course wanted to make my own. So, I started to note every feature I liked in different designs and researched different ways to include hidden compartments. After determining the general design, I began to select wood, since the listed size of wood is different than its physical dimensions (a 2” x 4” is actually 1.5” x 3.5”). Wood is also only sold in specific lengths, meaning I couldn’t make the dimensions longer than that of the lumber being sold. With all this information I made a table of wood sizes and used it to determine the bookcase dimensions.
I’ve moved many times in my life, so I know from experience how difficult bulky objects can be during a move. Taking this into account, I made sure my bookcase was able to be broken down into sections to be smaller and lighter. I also made sure to add supports to each shelf, similar to how an I-beam is built, in order to prevent bowing of the board due to the weight of books and the long distance between shelf and support. After all of this was designed on paper, I began modeling it in Autodesk Inventor (CAD) to make sure my concept could be made into a working model. If my measurements were off, the CAD drawing wouldn’t fit together correctly, and I could make adjustments.


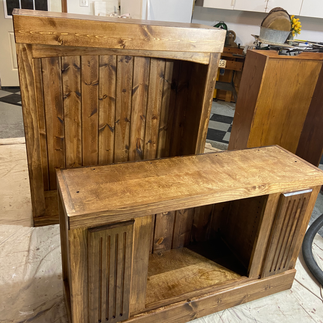
From there I built a bill of materials and made numerous trips to Menards and other hardware stores to gather all the needed supplies. After all the materials were accounted for, I began to build. Some parts required some ingenuity to complete. I didn’t have a square big enough to span the whole piece, so I used geometry to make sure the hypotenuses were the same (or as close as I could get them). The shelving holes and bolt holes needed to attach the top and bottom halves were too close to the walls of the bookcase to use the drill, so I had to find an attachment that’s radius was less than that of the distance between the center of the bolt and the wall of the bookcase. The heavy-duty drawer slides I used were expensive, so I ended up only using two per drawer even though they were very tall and subject to torsion. To counter this I put them on opposite edges to ensure as little moment forces could be applied from any direction as possible. The downside being that size variances due to the lack of precision tools, meant each drawer and slot required a time consuming custom fit. I added magnetic keepers to keep the drawers closed and added locks to some drawers to allow for more secure storage.
Making sure everything had enough clearance to fit together, while still needing access to remove pieces and make adjustments was a process in itself and required a lot of creative work arounds and much more time than I’d expected. With Christmas break nearing its end I was running out of time to finish the project, but I ran into another issue during the sealing process. Due to humidity in the workshop the lacquer I applied was looking milky instead of clear. I had to research the issue and address the situation, then add more layers of lacquer. I added extra layers of lacquer to surfaces of heavy wear such as the shelves so that it didn’t begin to chip or show wear over time. Finally, a last fitting had to be done on areas of tight tolerance since lacquer is adding dimensions to the final product.


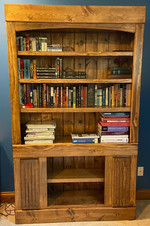
When the project had time to cure and air out, I put it in my room and finally had a place for all my books. I thoroughly enjoyed making this bookcase but it certainly tested my skills and helped me to learn many new ones. Some key takeaways from making this bookcase have to do with my methods of completion and cutting corners. Under tight time constraints, some corners had to be cut, but it was important to decide where I could afford to do so while keeping the project within spec. I noticed the wood glue I used showed up after staining if it wasn’t all sanded off, so I missed a few areas in the final product that can be noticed. However, they were mostly on the inside bottom of the shelves where no one would see them, so it was a cut corner without any real consequence. Another issue was a router cut made on the wrong side of the piece that had to be filled back in and cured before redoing the cut on the correct side. This had once again cost me valuable time and required adding extra supports to counteract any weaknesses from the inhomogeneity of the piece. In this case, my speed from measurement to cut was not worth the time it took to fix the mistake. I should have triple checked my work before making the cut. In a project as complex as this, sometimes double checking isn’t enough.


Comments